|
Functional Features
Light the charcoal fast without lighter
fluid
You light it without starter fluid or red hot chimneys using crumpled
newspaper. Click | here | to see a short video of the charcoal
lighting process.
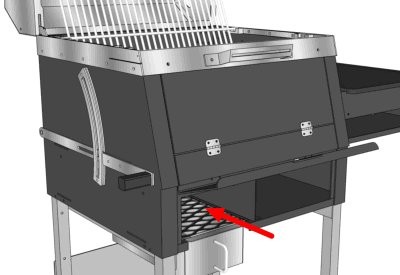
The hardware is designed into the grill. Pour in charcoal, add
newspaper through a door at the bottom, and light it. The burning paper quickly ignites the
coals. You'll be grilling in less than 15 minutes. If the kids are screaming and you
are in a hurry, simply add additional loads of newspaper and it will light even
faster.
Lighting your charcoal takes less time than with a chimney or starter
fluid. You'll be ready to grill in roughly the same time it takes to heat up a gas grill.
If you are in a hurry, you can add another load of newspaper and speed up the process even
more. You can also use some of the more environmentally friendly starters that you place
under the charcoal. But nothing seems to work as fast as newspaper. (Another tip that adds
to the "master griller" factor: Pour some vegetable oil on the newspaper before
you light it. You'll see a longer, hotter flame that lights even
faster.)
Control the heat with a simple lever on
the side
The charcoal fire is contained in a movable basket inside the
firebox. You raise and lower it with a simple smooth motion. Click | here | to see how
the heat control lever works.
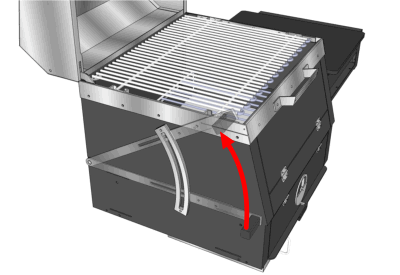
- At the "high" end of the spectrum the coals are directly under the
grate for intense radiant heat.
- In the "medium" range, the coals are 4 to 6 inches below for
traditional "backyard barbecue" temperatures. (The center of travel is the same as the
fixed distance in a typical kettle, so you can use the same techniques and
timing.)
- At the "low" end the coals are 9 inches from the food for slower
cooking turkeys, brisket, ribs and other slow foods. You can also drop the coals after you
sear a steak to get the middle exactly how you like it without burning the
outside.
Access the fire without lifting the
hood
Another way to control your heat is by adding more charcoal or moving
it around to form different patterns under the cooking grate. It's eay to do this through a
door in the front that opens wide—like an oven.
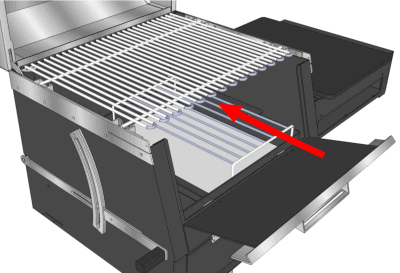
This means you can tend the fire without opening the cover, touching
the grate or moving the food around.
And you can add more charcoal or wood chips for smoke at any time
during the process. You can get at the inside of the grill when it comes time for
cleanup.(Another cute little trick: you can open the door to look up through the bottom of
the cooking grate and see if the steaks are ready to turn.)
Control the airflow for low heat and high
smoke
The grill has heavy-duty vents that are
easy to operate. The vents control the convective heat by changing the airflow past
the food. Open for a hotter fire, closed for less heat and more
smoke.

They are located on the side and front—not on the bottom, like a
kettle.
Create bold
char marks with a heavy
grate
When the food hits this grate you get smoke and sizzle ... conductive
heat in action. The grate is a hand-welded chunk of stainless steel that's heavy and solid.
The heavier the grate, the better the char. You get the deep, dark marks that are the
signature of fine food properly grilled.
Keep the grill clean
All the mechanical processes are designed for cleanliness. The grill
funnels ash, spent coals and general messiness into a removable stainless pan at the
bottom. All internal surfaces are flat, not curved, with fewer nooks and crannies to
collect dirt. And there is little exposed hardware inside, so it's easier to scrape
down.
Quality Features
• The firebox of the grill is hand-welded of eleven
gauge (1/8 inch) steel. All parts that touch the fire are coated with a ceramic
paint formulated to stand up to the heat, acids and fats from the
food.
• The hood, cooking grate, trim and all
moving parts are made of 11 gauge (1/8 inch) 304 stainless steel. (You can test it. A
magnet won't stick. it's not that Chinese junk that will start to rust in a
year!)
• All hardware is marine grade stainless
steel.
• The cooking grate is heavy gauge hand welded 304
stainless. It flips up for access to the fire, or to clean the bottom where the gunk
builds up. All the crud falls inside where you can dispose of it.This grate is
removable, will fit inside a self-cleaning oven and will come out looking like new.
The grate hangs from hooks on the side of the firebox when not in use.
• The universal mounting rails at the top of the
firebox will accomodate our specially designed skewer rack, our rotisserie rack and
other accessories yet to be released. The cover will close and seal with the
accessories in use.
• The ash pan is 16 gauge stainless steel and has a
large handle to make it easy (and safe) to dump the ashes. The pan is long and
skinny so you can dump the ashes into an empty charcoal bag. (Please make sure that
all the coals are out and stone cold before you do this. I have learned this lesson
the hard way!)
• All internal grates are easy to remove when it comes
time for a thorough cleaning. The inside surfaces of the firebox are deliberately
flat and straight to make it easy to scrape down the inside of the grill with your
spatula or the cleaning tool we include with the grill.
• The coal basket has plenty of room for a drip pan
when you are barbecuing with indirect heat or when you are using the slow cook
rack.
• The access door on the front of the firebox is
large and can be opened without opening the hood and releasing heat. The door is large
enough to add charcoal, wood chips, rearrange your fire or look up through the bottom
of the cooking grate to see if it is time to turn the steaks.
• The vents are 11 gauge stainless steel. The vents are designed
with a larger opening so that when the top vent is open you can actually see what is
going on under the hood.
• The handles are insulated with a special foam material that
will keep them cool to the touch.
|
|
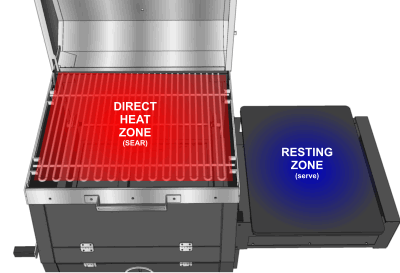
How to Use the B1 Grill
Set it up for functional
grilling
There are three basic types of cooking when
you are using a charcoal grill. Pure searing, sear then rest, and
roasting-smoking.
Let's start with the type of grilling that most people
do—grilling meat and vegetables. For this, you will get the best results using the
sear then rest method. Click | here | to see a video of this process. It's a
three-step process that you'll use over and over for everyday grilling. We designed it
so that when you light the grill it automatically creates this versatile
setup.
You get a zone on the grill for each function and
your work will flow logically from left to right. Why didn't anybody think of this
before?

Let's assume that you have a nice load of charcoal lit.
You automatically get the two-zone configuration, but you can move the coals into
whatever pattern you want.
Prep your foods in the kitchen on the cutting board. The
cutting board drops into the side worktable on the right side.
-
Raise the handle for heat high so you have a nice hot
grate.
-
Start the food on the left side directly over the coals for
searing and crisping. Rotate 90 degrees for crosshatch char marks.
-
Flip and repeat - still on the direct zone to the left.
-
Move it to the right side to rest and reabsorb juices. A
foil drip pan under this side will keep things clean.
-
Then it's back to the cutting board for carving and
service
-
Meanwhile another cutting board of food is on it's way from the
kitchen.
-
Repeat until everybody is happy.
Grill for a crowd, there's plenty of
room
Same process, but if you are serving a large crowd, you
can light more charcoal, spread it evenly across the coal basket and make the entire 400
square inches a direct heat zone. Remember that you can bring the fire right up close to
the top, so you usually don't need as many coals as you think you do.
You can move a lot of food in a very efficient manner.
We have grilled hundreds of steaks at festivals and parties in just a few hours, and you
will intuitively "get" how this works once you try it a few times.
The grate is 400 square inches and it can be configured
for all indirect, two zone, or slow cooking. It's the right compromise between size and
charcoal use. You really don't want to fire up a whole bag of charcoal every time you want
a burger. We've had several customers concerned about the size, but once they get the
grill, they are very pleased with the efficiency and the way the process works. Or you
could buy two grills....
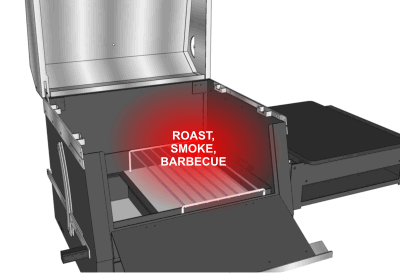
Roasting-Smoking, Traditional
Barbecue
This is the setup for
turkeys, beer can chickens, roasts and anything else you want to play around with for a low
and slow barbecue. Remove the cooking grate. Add a load of charcoal along
the left side of the coal basket. Place a drip pan and the slow cook rack in the
right side of the coal basket.
If you want a long slow
burn, put newspaper only in the front of the lighting chamber which will light only
part of the charcoal. The charcoal will burn gradually (sort of like a cigar)
and increase the interior temperature more gradually yielding a longer, lower burn and
the food will have more time to absorb the smokey flavor.
Place your food on the
slow cook rack to the right of the coals. Close the cover and adjust the vents for whatever
temperature you need.
By watching the
thermometer and adjusting the vents, you can easily get a 250° - 400° fire that will last
for three hours. You can open the front door to add smoke chips at any time without lifting
the cover or moving the food. With a little practice, you can achieve anything from a
Thanksgiving turkey to competition-quality brisket and ribs.
Examples of the grill setup for slow
cooking:
We cooked up five racks of baby back ribs for my Dad's 92nd birthday
party in September. We used both the slow cook rack
and the top grate and had plenty of room. We used
cherry wood chips and lump charcoal for three hours at around 250° F.
 
Five racks of ribs and two chickens for a large birthday party
It was a chatty bunch who got very quiet
when the food came out. Two people said they were the best ribs they ever had in their
entire life! We also
grilled up two chickens while the ribs were tenderizing in the foil. We fed 16 big eaters
and had a lot left over, all on less than one bag of good quality
charcoal.
 
A 20 pound turkey from Thanksgiving '09.
This turkey took about four hours on the grill and
one hour resting in a tight cooler to keep it warm. It was very moist and tender and the
oven was free for side dishes.

|


